m (Reverted edits by Titanic theorizer (talk) to last version by Josiahblaze) |
|||
| (32 intermediate revisions by 11 users not shown) | |||
| Line 8: | Line 8: | ||
|use = Combat |
|use = Combat |
||
|description = A large battle mech. |
|description = A large battle mech. |
||
| ⚫ | }}The {{Nihongo|'''Great Eggman Robo'''|巨大エッグマンロボ|Kyodai Egguman Robo}} is an object that appears in ''[[Sonic & Knuckles]]'', and its lock-on addition ''[[Sonic the Hedgehog 3 & Knuckles]]''. It was a massive battle mech created by [[Doctor Eggman|Dr. Robotnik]]. Powered by the [[Master Emerald]], it was used by Robotnik to battle [[Sonic the Hedgehog|Sonic]] and [[Miles "Tails" Prower|Tails]] aboard his damaged [[Death Egg]] during the first [[Angel Island]] incident. |
||
| ⚫ | |||
| ⚫ | The {{ |
||
==Description== |
==Description== |
||
===Appearance=== |
===Appearance=== |
||
| − | The Great Eggman Robo somewhat resembles the [[Death Egg Robot]], only this robot is much bigger and has a |
+ | The Great Eggman Robo somewhat resembles the [[Death Egg Robot]], only this robot is much bigger and has a closer resemblance to the [[EggRobo]] model. |
===Powers and abilities=== |
===Powers and abilities=== |
||
| − | With the [[Master Emerald]] serving as its power source, the Great Eggman Robo was an extremely powerful machine. Its sheer size granted it immense strength, enough to crush a person using only its fingers and walk through the metallic structures onboard the [[Death Egg]] like they were paper. It could also fire fireballs from its nostrils and slide down its torso to reveal a weapon that could fire immense laser beams channeled directly from the Master Emerald. |
+ | With the [[Master Emerald]] serving as its power source, the Great Eggman Robo was an extremely powerful machine. Its sheer size granted it immense strength, enough to crush a person using only its fingers, and walk through the metallic structures onboard the [[Death Egg]] like they were paper. It could also fire fireballs from its nostrils and slide down its torso to reveal a weapon that could fire immense laser beams channeled directly from the Master Emerald. |
==History== |
==History== |
||
| + | ===''Sonic & Knuckles''=== |
||
| − | Having beaten the [[Death Ball]] |
+ | Having beaten the [[Death Ball]] onboard the [[Death Egg]], [[Sonic the Hedgehog]] and [[Miles "Tails" Prower]] chased after [[Doctor Eggman|Dr. Robotnik]] when the doctor made his escape. Eventually, the group arrived at the [[Master Emerald]]-powered Great Eggman Robo, which the doctor quickly jumped into though a hatchway that closed behind him. Robotnik subsequently brought his creation into position for a final showdown with Sonic and Tails. After the heroes destroyed the Great Eggman Robo's hands however, Robotnik resorted to using its alternate weapons while he tried closing in on Sonic and Tails. Despite this, Sonic and Tails succeeded in defeating the Great Eggman Robo by attacking its Emerald chamber. As the giant mech went down in flames, Robotnik made an escape attempt in his [[Egg Mobile]] with the Master Emerald in tow, while the Death Egg fell apart around him. |
==Battle== |
==Battle== |
||
| Line 32: | Line 32: | ||
|description = A giant Eggman-looking robot with robotic fingers and different phases, using Master Emerald as its energy source. |
|description = A giant Eggman-looking robot with robotic fingers and different phases, using Master Emerald as its energy source. |
||
|previous = [[Death Ball]] |
|previous = [[Death Ball]] |
||
| − | |next = [[The Doomsday Zone]] {{C|[[Sonic the Hedgehog|Sonic]]}} |
+ | |next = [[The Doomsday Zone]] {{C|[[Sonic the Hedgehog|Sonic]]}} |
| ⚫ | }}The Great Eggman Robo is the final boss of the [[Death Egg Zone (Sonic & Knuckles)|Death Egg Zone]] in ''[[Sonic & Knuckles]]'' and its locked-on form ''[[Sonic the Hedgehog 3 & Knuckles]]''. It is the fourteenth boss of ''Sonic & Knuckles'' and the twenty-sixth overall boss of ''Sonic the Hedgehog 3 & Knuckles'' in [[Sonic the Hedgehog|Sonic]] and [[Miles "Tails" Prower|Tails]]' playthroughs of said games. |
||
| − | }} |
||
| ⚫ | The Great Eggman Robo is the final boss of the [[Death Egg Zone (Sonic & Knuckles)|Death Egg Zone]] in ''[[Sonic & Knuckles]]'' and its locked-on form ''[[Sonic the Hedgehog 3 & Knuckles]]''. It is the |
||
| − | The Great Eggman Robo is fought with Sonic or Tails after defeating the [[Death Ball]] |
+ | The Great Eggman Robo is fought with Sonic and/or Tails after defeating the [[Death Ball]]. Alternatively, the player can use [[Level Select]] to access this boss (under "Doomsday Act 2") as [[Knuckles the Echidna|Knuckles]]. It serves as the final boss for Tails, as well as for Sonic if the player did not collect all seven [[Chaos Emerald]]s/[[Super Emerald]]s. |
===Boss guide=== |
===Boss guide=== |
||
| − | Like in the final |
+ | Like in the final boss battles in the original [[Sonic the Hedgehog (1991)|''Sonic the Hedgehog'']] and ''[[Sonic the Hedgehog 2]]'', there are no [[Ring]]s available during the fight with the Great Eggman Robo, although any Rings still in hand from [[Death Egg Zone (Sonic & Knuckles)|Death Egg Zone]] Act 2 are carried forward. |
====Phase one==== |
====Phase one==== |
||
| − | Phase one begins immediately after defeating the [[Death Ball]], with the playable character(s) |
+ | Phase one begins immediately after defeating the [[Death Ball]], with the playable character(s) running off-screen. The screen proceeds to fade to black before returning with a "Death Egg Zone Act 2" title card, revealing the scene where Robotnik enters the Great Eggman Robo. After that, the ground starts to collapse from the left. To avoid it, the player must forget about the Great Eggman Robo and run to the stable ground on the right. Once far enough to the right, the Great Eggman Robo will come back in from the left, filling the screen with its massive size. Here, the real fight begins. |
| − | During the first phase, the Great Eggman Robo attacks with its massive fingers, which the player must destroy |
+ | During the first phase, the Great Eggman Robo attacks with its massive fingers, which the player must destroy while dodging their attacks. These fingers are collected in two groups of three. Each "hand" locks onto the character if they are close enough before rising up and then slamming down into the floor. Unless the character is [[Spin Dash]]ing, getting caught under the fingers will damage the player. The Great Eggman Robo will repeat this attack pattern until the phase is over. |
| − | Three hits are needed to destroy each of the six fingers. To damage the fingers, the player |
+ | Three hits are needed to destroy each of the six fingers. To damage the fingers, the player must execute one of the following moves while the fingers are on the ground: |
| − | *[[Spin Jump|Jump]] just when the fingers are about to fall and then bounce on |
+ | *[[Spin Jump|Jump]] just when the fingers are about to fall and then bounce on top of them while they touch the ground. |
| − | *Keep revving up a Spin Dash and let the fingers destroy themselves when they bring |
+ | *Keep revving up a Spin Dash and let the fingers destroy themselves when they bring themselves down on the playable character. |
| − | *Release a Spin Dash while standing in-between fingers, and use this to ricochet between two or more of them. If this option is chosen |
+ | *Release a Spin Dash while standing in-between fingers, and use this to ricochet between two or more of them. If this option is chosen, the player must make sure that the fingers are not up against the screen's walls. If they are, the player's Spin Dash will come to a halt when they reach the leftmost finger. The game will then assume that the playable character has been [[crusher|crushed]] between it and the wall, and will restart the boss battle. |
| − | It is possible to hit two fingers at the same time with one attack (although the |
+ | It is possible to hit two fingers at the same time with one attack (although the positioning must be right) or hit a finger twice with one attack. Additionally, Sonic can hit up to three fingers at once with his [[Insta-Shield]]. |
====Phase two==== |
====Phase two==== |
||
[[File:DEZBoss2.png|thumb|left|200px|Second phase of Great Eggman Robo.]] |
[[File:DEZBoss2.png|thumb|left|200px|Second phase of Great Eggman Robo.]] |
||
| − | Once all the fingers have been destroyed, the Great Eggman Robo drops below the platform |
+ | Once all of the fingers have been destroyed, the Great Eggman Robo drops below the platform. It will then appear from the side at the far left of the screen, marking the start of the second phase. During this phase, the mech walks slowly towards the player. Meanwhile, the player must avoid the flames fired from the Great Eggman Robo's nose. This attack is lethal right from the moment it leaves the nose, meaning the player has to time attacks very carefully, as the nose is the part that needs to be hit. |
| − | Hitting the nose will not |
+ | Hitting the nose will not damage this boss. However, it will cause the mech to open its chest chamber, revealing the [[Master Emerald]] inside a laser weapon that begins charging once revealed. The player can score a hit (or two) by hitting the Emerald weapon while it is charging. After the weapon has charged for a few seconds, it will fire a laser across the screen that can only be dodged if the player is at the apex of a jump. It is best to listen to the sound the weapon makes as it charges to help with the timing when dodging this attack. A split-second after the sound ends, the weapon fires. It is also possible to dodge the laser by heading as far to the right as possible and then crouching, although, to pull such an attempt off, the Great Eggman Robo must be rising up from a step while firing its laser, which is a rare occurrence. |
Another good way to avoid contact with the laser beam is to jump over to the left and hit the top of the Emerald weapon right when the laser beam is fired. It is recommended not to try and hit it again right after this, as the Emerald weapon might close on the player and cause them to fall off the bottom of the screen. |
Another good way to avoid contact with the laser beam is to jump over to the left and hit the top of the Emerald weapon right when the laser beam is fired. It is recommended not to try and hit it again right after this, as the Emerald weapon might close on the player and cause them to fall off the bottom of the screen. |
||
| − | To clear this phase, |
+ | To clear this phase, the player must hit the Emerald weapon eight times. After that, the Great Eggman Robo drops off the screen again, defeated. |
====Phase three==== |
====Phase three==== |
||
[[File:DEZBoss3.png|thumb|200px|Final phase of Great Eggman Robo.]] |
[[File:DEZBoss3.png|thumb|200px|Final phase of Great Eggman Robo.]] |
||
| − | After the end of the second phase, |
+ | After the end of the second phase, an [[Egg Mobile]] piloted by Robotnik (or an [[Eggrobo]] if the player is using [[Knuckles the Echidna|Knuckles]]) will rise up from the Great Eggman Robo's wreck. This Egg Mobile has the Master Emerald on the end of its grabbing device. The vehicle then flies off to the right, and the platform rapidly starts crumbling from the left. Meanwhile, debris falls down from above as the Death Egg falls apart. |
| − | All there is to this phase is running to catch up with the Egg Mobile and hitting it |
+ | All there is to this phase is running to catch up with the Egg Mobile and hitting it. The floor rapidly drops away during this part - nearly as quickly as the player can run. The greatest danger is flying off the end just after the last hit is scored, making for an extremely frustrating death. The player must keep moving to the right, especially after the seventh hit to avoid the pitfall left behind by the falling platform. One should also make sure to time their [[Spin Jump]] when the character is underneath or to the right of the Egg Mobile, or the resulting bounce may be enough to throw the character off into open space and cause an instant death. |
During this phase, it should be noted that the clock has stopped. One can also not remain in a [[Super State]]/Hyper State during this phase. |
During this phase, it should be noted that the clock has stopped. One can also not remain in a [[Super State]]/Hyper State during this phase. |
||
| − | After eight hits the Egg Mobile |
+ | After eight hits, the Egg Mobile will explode, followed by the Death Egg itself, and the Master Emerald will drop onto the platform next to the player’s character, marking the end of the fight. After that, one of the following things will happen, each of which depends on the player's progression through the game and their chosen character for the boss fight: |
| − | *If |
+ | *If the player has chosen Sonic as the playable character, and is in possession of all of the [[Super Emerald]]s, the game will progress to [[The Doomsday Zone]] with the best ending. |
| − | *If |
+ | *If the player has chosen Sonic as the playable character, and is in possession of all of the [[Chaos Emerald]]s, but not all the Super Emeralds, the game will progress to The Doomsday Zone with the good ending. |
| − | *If |
+ | *If the player has chosen Sonic as the playable character, but is missing some of the Chaos Emeralds, the game will go to the regular ending. |
| − | *If |
+ | *If the player has chosen Tails as the playable character, and is in possession of all of the [[Super Emerald]]s, the game will progress to the good ending for Tails. |
| − | *If |
+ | *If the player has chosen Tails as the playable character, but is missing some of the Emeralds, the game will progress to the normal ending for Tails. |
| − | *If |
+ | *If the player has chosen Knuckles as the playable character, the game will go back to the Sega logo and then the title screen, without an ending sequence. |
| + | |||
| + | ===Music=== |
||
| + | {| class="wikitable" width="670" border="1" |
||
| + | ! style="text-align: center; " |'''Name''' |
||
| + | !Artist(s) |
||
| + | !Length |
||
| + | !Music Track |
||
| + | |- |
||
| + | |Final Boss |
||
| + | |[[Tatsuyuki Maeda]], [[Tomonori Sawada]], Sachio Ogawa, [[Masayuki Nagao]], Masanori Hikichi |
||
| + | |1:50 |
||
| + | |[[File:Sonic the Hedgehog 3 27 - Final Boss (Big Arms).ogg|center]] |
||
| ⚫ | |||
==Trivia== |
==Trivia== |
||
*Only the upper part of the robot's body is ever visible; the lower body, legs, and arms are never shown. |
*Only the upper part of the robot's body is ever visible; the lower body, legs, and arms are never shown. |
||
| − | *This boss segment |
+ | *This boss segment is listed in the Sound Test as '''The Doomsday Zone Act 2'''. |
| − | *This boss stage is not available for Knuckles unless |
+ | *This boss stage is not available for Knuckles unless Level Select is enabled. When Knuckles does fight the boss, although Robotnik can be seen entering the robot, EggRobo is seen retreating with the Master Emerald in the third phase of the battle. |
| − | * |
+ | *The right eye of this robot is different than the left one. It may be used by Robotnik as a pointer, or it might be the EggRobo assisting him in controlling the machine. |
| − | *The music for this boss battle is the same for the [[Big Arm|final boss]] of ''[[Sonic the Hedgehog 3]]'' as well as the first phase of the Mecha Sonic |
+ | *The music for this boss battle is the same for the [[Big Arm|final boss]] of ''[[Sonic the Hedgehog 3]]'', as well as the first phase of the battle with Mecha Sonic in Knuckles's portion of the story. |
| − | ** |
+ | **This music was later remixed for [[Last Utopia Zone]] in ''[[Sonic the Hedgehog Pocket Adventure]]'', for [[Nocturne]] in ''[[Sonic Chronicles: The Dark Brotherhood]]'', for [[Big Arm (Classic Sonic's world)#Battle|Big Arm]] in ''[[Sonic Generations]]'' and during the [[Metal Mayhem|fifth episode]] of the ''[[Sonic Mania Adventures]]'' webseries. |
[[File:Kyodai-Eggman-Robo-Sonic-&-All-Stars-Racing-Transformed.png|thumb|A Great Eggman Robo-like droid in ''[[Sonic & Sega All-Stars Racing]]''.]] |
[[File:Kyodai-Eggman-Robo-Sonic-&-All-Stars-Racing-Transformed.png|thumb|A Great Eggman Robo-like droid in ''[[Sonic & Sega All-Stars Racing]]''.]] |
||
| − | *In [[Egg Hangar |
+ | *In the [[Egg Hangar]] in ''[[Sonic & Sega All-Stars Racing]]'' and ''[[Sonic & All-Stars Racing Transformed]]'', several laser turret droids resembling the Great Eggman Robo appear in the hangar area of the [[Death Egg]]. |
| − | *If ''[[Sonic & Knuckles]]'' is played on ''[[Sonic Classic Collection]]'', then it is possible to save up to this point without having to do the entire |
+ | *If ''[[Sonic & Knuckles]]'' is played on ''[[Sonic Classic Collection]]'', then it is possible to save up to this point without having to do the entire Zone again. |
| − | *If the player dies after engaging in combat with this boss |
+ | *If the player dies after engaging in combat with this boss, when they re-enter the battle, their time will be completely reset. |
==Gallery== |
==Gallery== |
||
| − | {{Gallery start}} |
+ | {{Gallery start}}<gallery> |
| − | <gallery> |
||
Sonic & Knuckles final boss (Gigantic Eggman Robo) - front.png|Front view of Great Eggman Robo showing fingers |
Sonic & Knuckles final boss (Gigantic Eggman Robo) - front.png|Front view of Great Eggman Robo showing fingers |
||
Sonic & Knuckles final boss (Gigantic Eggman Robo) - side.png|Great Eggman Robo side view |
Sonic & Knuckles final boss (Gigantic Eggman Robo) - side.png|Great Eggman Robo side view |
||
Sonic & Knuckles final boss (Gigantic Eggman Robo) - side showing cannon.png|Side view with chestplate lowered, showing Master Emerald inside |
Sonic & Knuckles final boss (Gigantic Eggman Robo) - side showing cannon.png|Side view with chestplate lowered, showing Master Emerald inside |
||
</gallery> |
</gallery> |
||
| + | |||
{{Gallery end}} |
{{Gallery end}} |
||
{{-}} |
{{-}} |
||
| + | |||
{{Sonic 3 & Knuckles info}} |
{{Sonic 3 & Knuckles info}} |
||
[[Category:Sonic & Knuckles bosses]] |
[[Category:Sonic & Knuckles bosses]] |
||
Revision as of 16:29, 31 July 2020
The Great Eggman Robo (巨大エッグマンロボ Kyodai Egguman Robo?) is an object that appears in Sonic & Knuckles, and its lock-on addition Sonic the Hedgehog 3 & Knuckles. It was a massive battle mech created by Dr. Robotnik. Powered by the Master Emerald, it was used by Robotnik to battle Sonic and Tails aboard his damaged Death Egg during the first Angel Island incident.
Description
Appearance
The Great Eggman Robo somewhat resembles the Death Egg Robot, only this robot is much bigger and has a closer resemblance to the EggRobo model.
Powers and abilities
With the Master Emerald serving as its power source, the Great Eggman Robo was an extremely powerful machine. Its sheer size granted it immense strength, enough to crush a person using only its fingers, and walk through the metallic structures onboard the Death Egg like they were paper. It could also fire fireballs from its nostrils and slide down its torso to reveal a weapon that could fire immense laser beams channeled directly from the Master Emerald.
History
Sonic & Knuckles
Having beaten the Death Ball onboard the Death Egg, Sonic the Hedgehog and Miles "Tails" Prower chased after Dr. Robotnik when the doctor made his escape. Eventually, the group arrived at the Master Emerald-powered Great Eggman Robo, which the doctor quickly jumped into though a hatchway that closed behind him. Robotnik subsequently brought his creation into position for a final showdown with Sonic and Tails. After the heroes destroyed the Great Eggman Robo's hands however, Robotnik resorted to using its alternate weapons while he tried closing in on Sonic and Tails. Despite this, Sonic and Tails succeeded in defeating the Great Eggman Robo by attacking its Emerald chamber. As the giant mech went down in flames, Robotnik made an escape attempt in his Egg Mobile with the Master Emerald in tow, while the Death Egg fell apart around him.
Battle
The Great Eggman Robo is the final boss of the Death Egg Zone in Sonic & Knuckles and its locked-on form Sonic the Hedgehog 3 & Knuckles. It is the fourteenth boss of Sonic & Knuckles and the twenty-sixth overall boss of Sonic the Hedgehog 3 & Knuckles in Sonic and Tails' playthroughs of said games.
The Great Eggman Robo is fought with Sonic and/or Tails after defeating the Death Ball. Alternatively, the player can use Level Select to access this boss (under "Doomsday Act 2") as Knuckles. It serves as the final boss for Tails, as well as for Sonic if the player did not collect all seven Chaos Emeralds/Super Emeralds.
Boss guide
Like in the final boss battles in the original Sonic the Hedgehog and Sonic the Hedgehog 2, there are no Rings available during the fight with the Great Eggman Robo, although any Rings still in hand from Death Egg Zone Act 2 are carried forward.
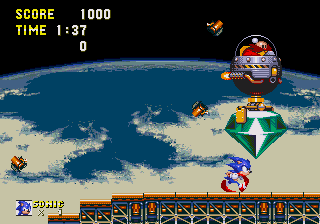
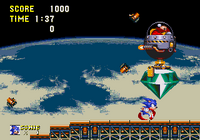
Phase one
Phase one begins immediately after defeating the Death Ball, with the playable character(s) running off-screen. The screen proceeds to fade to black before returning with a "Death Egg Zone Act 2" title card, revealing the scene where Robotnik enters the Great Eggman Robo. After that, the ground starts to collapse from the left. To avoid it, the player must forget about the Great Eggman Robo and run to the stable ground on the right. Once far enough to the right, the Great Eggman Robo will come back in from the left, filling the screen with its massive size. Here, the real fight begins.
During the first phase, the Great Eggman Robo attacks with its massive fingers, which the player must destroy while dodging their attacks. These fingers are collected in two groups of three. Each "hand" locks onto the character if they are close enough before rising up and then slamming down into the floor. Unless the character is Spin Dashing, getting caught under the fingers will damage the player. The Great Eggman Robo will repeat this attack pattern until the phase is over.
Three hits are needed to destroy each of the six fingers. To damage the fingers, the player must execute one of the following moves while the fingers are on the ground:
- Jump just when the fingers are about to fall and then bounce on top of them while they touch the ground.
- Keep revving up a Spin Dash and let the fingers destroy themselves when they bring themselves down on the playable character.
- Release a Spin Dash while standing in-between fingers, and use this to ricochet between two or more of them. If this option is chosen, the player must make sure that the fingers are not up against the screen's walls. If they are, the player's Spin Dash will come to a halt when they reach the leftmost finger. The game will then assume that the playable character has been crushed between it and the wall, and will restart the boss battle.
It is possible to hit two fingers at the same time with one attack (although the positioning must be right) or hit a finger twice with one attack. Additionally, Sonic can hit up to three fingers at once with his Insta-Shield.
Phase two


Second phase of Great Eggman Robo.
Once all of the fingers have been destroyed, the Great Eggman Robo drops below the platform. It will then appear from the side at the far left of the screen, marking the start of the second phase. During this phase, the mech walks slowly towards the player. Meanwhile, the player must avoid the flames fired from the Great Eggman Robo's nose. This attack is lethal right from the moment it leaves the nose, meaning the player has to time attacks very carefully, as the nose is the part that needs to be hit.
Hitting the nose will not damage this boss. However, it will cause the mech to open its chest chamber, revealing the Master Emerald inside a laser weapon that begins charging once revealed. The player can score a hit (or two) by hitting the Emerald weapon while it is charging. After the weapon has charged for a few seconds, it will fire a laser across the screen that can only be dodged if the player is at the apex of a jump. It is best to listen to the sound the weapon makes as it charges to help with the timing when dodging this attack. A split-second after the sound ends, the weapon fires. It is also possible to dodge the laser by heading as far to the right as possible and then crouching, although, to pull such an attempt off, the Great Eggman Robo must be rising up from a step while firing its laser, which is a rare occurrence.
Another good way to avoid contact with the laser beam is to jump over to the left and hit the top of the Emerald weapon right when the laser beam is fired. It is recommended not to try and hit it again right after this, as the Emerald weapon might close on the player and cause them to fall off the bottom of the screen.
To clear this phase, the player must hit the Emerald weapon eight times. After that, the Great Eggman Robo drops off the screen again, defeated.
Phase three
Final phase of Great Eggman Robo.
After the end of the second phase, an Egg Mobile piloted by Robotnik (or an Eggrobo if the player is using Knuckles) will rise up from the Great Eggman Robo's wreck. This Egg Mobile has the Master Emerald on the end of its grabbing device. The vehicle then flies off to the right, and the platform rapidly starts crumbling from the left. Meanwhile, debris falls down from above as the Death Egg falls apart.
All there is to this phase is running to catch up with the Egg Mobile and hitting it. The floor rapidly drops away during this part - nearly as quickly as the player can run. The greatest danger is flying off the end just after the last hit is scored, making for an extremely frustrating death. The player must keep moving to the right, especially after the seventh hit to avoid the pitfall left behind by the falling platform. One should also make sure to time their Spin Jump when the character is underneath or to the right of the Egg Mobile, or the resulting bounce may be enough to throw the character off into open space and cause an instant death.
During this phase, it should be noted that the clock has stopped. One can also not remain in a Super State/Hyper State during this phase.
After eight hits, the Egg Mobile will explode, followed by the Death Egg itself, and the Master Emerald will drop onto the platform next to the player’s character, marking the end of the fight. After that, one of the following things will happen, each of which depends on the player's progression through the game and their chosen character for the boss fight:
- If the player has chosen Sonic as the playable character, and is in possession of all of the Super Emeralds, the game will progress to The Doomsday Zone with the best ending.
- If the player has chosen Sonic as the playable character, and is in possession of all of the Chaos Emeralds, but not all the Super Emeralds, the game will progress to The Doomsday Zone with the good ending.
- If the player has chosen Sonic as the playable character, but is missing some of the Chaos Emeralds, the game will go to the regular ending.
- If the player has chosen Tails as the playable character, and is in possession of all of the Super Emeralds, the game will progress to the good ending for Tails.
- If the player has chosen Tails as the playable character, but is missing some of the Emeralds, the game will progress to the normal ending for Tails.
- If the player has chosen Knuckles as the playable character, the game will go back to the Sega logo and then the title screen, without an ending sequence.
Music
| Name | Artist(s) | Length | Music Track |
|---|---|---|---|
| Final Boss | Tatsuyuki Maeda, Tomonori Sawada, Sachio Ogawa, Masayuki Nagao, Masanori Hikichi | 1:50 |
Trivia
- Only the upper part of the robot's body is ever visible; the lower body, legs, and arms are never shown.
- This boss segment is listed in the Sound Test as The Doomsday Zone Act 2.
- This boss stage is not available for Knuckles unless Level Select is enabled. When Knuckles does fight the boss, although Robotnik can be seen entering the robot, EggRobo is seen retreating with the Master Emerald in the third phase of the battle.
- The right eye of this robot is different than the left one. It may be used by Robotnik as a pointer, or it might be the EggRobo assisting him in controlling the machine.
- The music for this boss battle is the same for the final boss of Sonic the Hedgehog 3, as well as the first phase of the battle with Mecha Sonic in Knuckles's portion of the story.
- This music was later remixed for Last Utopia Zone in Sonic the Hedgehog Pocket Adventure, for Nocturne in Sonic Chronicles: The Dark Brotherhood, for Big Arm in Sonic Generations and during the fifth episode of the Sonic Mania Adventures webseries.

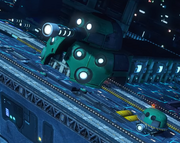
A Great Eggman Robo-like droid in Sonic & Sega All-Stars Racing.
- In the Egg Hangar in Sonic & Sega All-Stars Racing and Sonic & All-Stars Racing Transformed, several laser turret droids resembling the Great Eggman Robo appear in the hangar area of the Death Egg.
- If Sonic & Knuckles is played on Sonic Classic Collection, then it is possible to save up to this point without having to do the entire Zone again.
- If the player dies after engaging in combat with this boss, when they re-enter the battle, their time will be completely reset.
Gallery
| Gallery |
|---|
_-_front.png "Sonic & Knuckles final boss (Gigantic Eggman Robo) - front.png (12 KB)") Front view of Great Eggman Robo showing fingers _-_side.png "Sonic & Knuckles final boss (Gigantic Eggman Robo) - side.png (11 KB)") Great Eggman Robo side view _-_side_showing_cannon.png "Sonic & Knuckles final boss (Gigantic Eggman Robo) - side showing cannon.png (11 KB)") Side view with chestplate lowered, showing Master Emerald inside |
Template:Sonic 3 & Knuckles info